

How To Set Up Studio Monitors With Subwoofer
Starting a recording studio is really tough. Y'all accept to be a bit technical on how to fix upwards studio monitors, mixers, audio interface and recording software, etc for your home studio.
And when you don't get any solution to these technical dilemmas you become frustrated.
I also faced the same dilemma when I was setting up my first home studio, but I got rid of that, finding the solution from authentic sources like suggestions from established recordists and accurate books on recording setup.
After implementing those things, I could be able to deliver some corking records . I accept recorded several hit music with that setup.
I know many of you lot don't have a achieve to those authentic sources who will guide you to set up your domicile studio like a pro. So I'k here to share my experiences with y'all which I think tin help you a lot.
How To Gear up up Studio Monitors For Your Home Studio

Though abode studio fix is a lengthy process, the toughest part of the process is to gear up and calibrate studio monitors. At that place are several factors that directly or indirectly impact the sound quality of your monitor.
And so read this guide advisedly before setting up the studio monitors.
Non purchased still? Okay, earlier purchasing, accept a look into the studio monitor comparison nautical chart which I accept created for you lot.
Disclosure: This postal service may contain affiliate links, which ways we may receive a commission if you lot click a link and purchase something that we recommended. Read more near Affiliate disclosure here.
Here is the exact method of setting up studio monitors.
- Check the inputs and outputs of your studio monitor.
- Studio monitor placement.
- Switch on the recording arrangement and check the sound.
- Pink noise method for Proper alignment of Studio Monitors.
- Ear preparation method to understand your studio monitor sound.
Things to Consider before Setting up Your Monitor
I will describe all of the above points in this article but 1st y'all should proceeds some knowledge of the room set for your home studio. Remember, a properly optimized recording room volition increase the quality of sound.
The cost of tweaking your room for better sound quality depends on your needs. You tin can utilize costly materials or go with upkeep soundproofing materials. It'southward all depends on y'all. So, here are the tweaks.
Space
The 1st requirement to build a abode studio is the space. Though today we can set up a home studio in a very small space, for better results, you should take at least xv'X10′ large room.
As well as your room should take rounded corners equally information technology will increment the reflections.
The most important thing you lot take to pay attention to your room size is Sound Pressure level level (SPL).SPL or Acoustic level of a studio speaker depends on the wattage of the amp and the size of the woofer.
And then if you lot want to buy a big sized and heavy wattage monitor then yous must ready your studio in a large room.
Here is the list of required room size according to the size and wattage of studio monitors.
| Woofer Size | Wattage | Room Size |
|---|---|---|
| 3″ to 3.v″ | 15W to 30W | 9'X7′ |
| 5″ to 6.5″ | 30W to 60W | 13'X10′ |
| eight″ to 10″ | 60W to 100W | 15'X10′ |
| To a higher place 10″ and Subwoofers | 100W and Above | Larger so xv'X10′ |
Audio Handling
The 2d very important thing we should know most is proper audio treatment. Without a proper sound-treated room, you lot can't look a practiced quality sound.
Many people misunderstand the term audio handling as soundproofing but sound handling is not most packing your room to terminate the sound go out of that.
Sound treatment is a process to avoid the reflections of actress sounds by the walls so you could simply listen to the original sound created past your studio monitors.
There are many audio treatment processes are in apportionment, merely the best and easiest way for dwelling studios are ownership soundproof boards and fit them on the areas where the reflections are maximum.
You can get a broad inventory of sound treatment panels on Amazon but I would always advise to get these ones from Amazon only which is personal tested by me.
If you lot want to know more about this topic then must checkout my ultimate guide to acoustic handling.
Desktop Placement Vs Monitor Stands
The placement of your monitor speaker makes a big difference in the sound you go. If you have near-field studio monitors then you have to place them within 2-three feet from your ears.
On the other hand, if your room has a wide surface area and you have far-field monitors you should place them a minimum v-6 feets from your ears.
The primary difference between well-nigh-field and far-field monitors is the corporeality of sound which dissolves into the air earlier reaching your ears.
Near-field monitors have modest woofers with a wide dome which produce high-intensity sound when kept within 2-3 feet from your ears.
If you lot increase the distance gradually, after a certain distance, y'all tin notice a sudden driblet in the intensity of sound.
This is the holding of near-field monitors. This holding applies too when you modify the angle of speakers with respect to the listening source.
Far-field monitors are different. They take big size monitor, with loftier wattage. The intensity of audio is unaffected by the distance.
But don't compare them with PA speakers. Far-field monitors also have an intensity drop point. but its probably more than your room size.
Then, If you have a near-field monitor you tin place them on your recording tabular array as well as you lot can use monitor stands but keep them within the hearing range.
For far-field monitors, I would like to propose you use monitor stands equally they are usually used for reference monitors.
Almost-field monitors are platonic for mixing so always utilise the all-time quality nigh-field monitor if yous want your projects mixed by yourself.
Setup Process of Studio Monitor
Well, assuming you accept a good-sized and audio-treated room for your studio, we are going to fix studio monitors in your studio.
Checking the Input/Output and the Type of Monitor
1st of all you should cheque out the input and output which you have been provided on your studio monitor.
in that location are iii principal types of input and output sockets.
- 1/8″ TRS
- XLR
- RCA
Read besides,
- How To Get-go Recording Music in Your Home [Step-By-Step Guide]
It depends on your monitor manufacturers which input or output sockets yous get on your monitor pairs.
By and large, individuals active studio monitors which don't have whatsoever output sockets as there is no need to connect those speakers with each other.
But if yous accept a principal-slave blazon of monitors then yous must connect the slave with the primary as the main speaker has a congenital-in amp which should be connected with the slave speaker to go sound.
Depending on your monitor's input slot yous have to buy or set up the cable.
Note: Individually powered Studio monitors with XLR and TRS slots more often than not accepts balanced cables.
If y'all take this choice and so I suggest you to must use balanced cables as they will increase your monitor'south headroom by 4dB which is far more than then regular headroom.
With 4dB extra headroom, you tin mix your projects far ameliorate than ago.
Placement of studio monitors
In that location are three places for placement of studio monitors.
- On your recording table (Nearly-Field monitors)
- On monitor stands within 2-iii feet from your mixing chair (Near-field monitors)
- At the corner of your mixer table from 3 to five feet (far-field monitors)
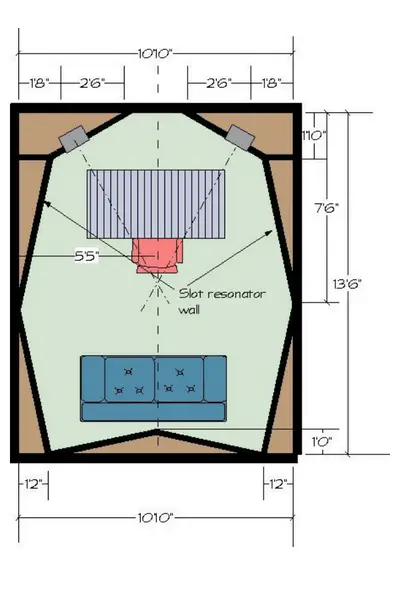
Make certain the bending of your monitors should the same equally the image shown beneath.
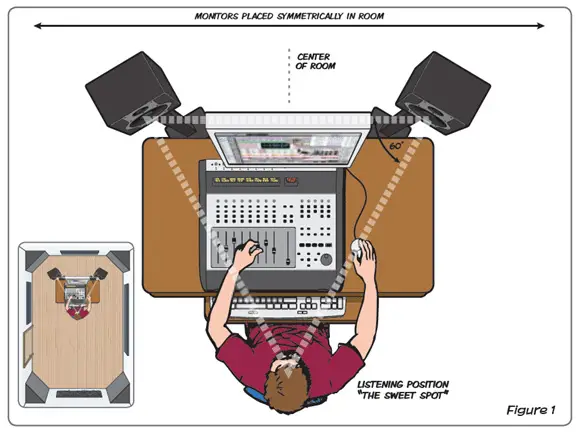
Also as the height of your monitor speakers is the same as your ear. See the image beneath for better understanding.
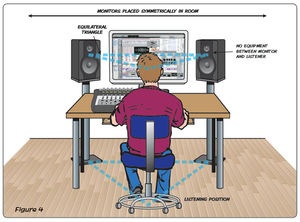
As you have seen that the angle and meridian of monitors exactly pointed to your ears, the audio generated by them perfectly observed by y'all.
The distance depends on the size of the monitor which I have given above in this article. Only the alignment of studio monitors must satisfy the above images.
I know y'all are wondered about how to perfectly align your monitors like the images above. And then, I accept a "Pinkish Noise" method which I will describe below in this article. But 1st off all plugin your monitors with sound interfaces and mixers.
Connecting with Sound Interfaces or Audio Mixers
Today the tendency of mixers are decreasing. Audio interfaces solitary are now capable of producing great quality sound.
If yous take a decent audio interface equipped with good preamps and Advertisement/DA converter, at that place is no need to ain an audio mixer.
Instead, nosotros can invest in controllers for better mixing experiences.
Well, connect your balanced cables with inputs of your monitor pairs and outputs of your audio interface. Make sure your system is turned off or you will spoil your audio interface and monitors.
Switch on The Arrangement and checking the Sound
Now switch on the system – Computer, Audio Interface, and Monitor pair while the volume key turned down to zero.
Outset a pre-recorded sound project or vocal and slowly plough the volume up on your audio mixer as well equally your monitor pairs.
When you lot are able to listen to the sounds clearly, stop turning the knobs.
Pinkish Dissonance Method to proper alignment of Studio Monitor
To properly calibrate your studio monitor by pink dissonance method, yous should have two things handy.
- An SPL meter – SPL Meter is an electronic device which measures the intensity of a sound accurately. If you don't have a SPL meter then you tin can become it on Amazon with just a few dollars Click here to checkout the toll
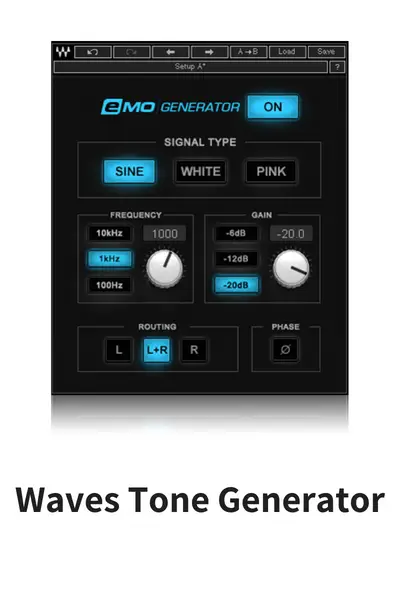
- Tone generator software – Usually you will detect this in your DAW. Just open up your DAW software and look for tone generator plugin in it.
How to calibrate Studio Monitors – The Procedure
- Place your monitors as divers in the above diagram and switch on the organisation. Plough your audio interface'south volume downwards. Open your DAW software and look for a tone generator plugin.
- Open the tone generator plugin and you will run into some options similar wave type selection, type of tone, sound level, etc.
- Set up the wave type to the sine wave and type tone into pink dissonance. Also, bank check 0dB on the audio level option in the tone generator. Go out all other settings intact.
- Now turn the volume knob of your audio interface and then yous could mind to the pink dissonance generated by the organisation.
- At present once again turn all the volume knobs down (Audio interface and studio monitor volume knobs).
85dB Standard volume SPL meter technique
- Now turn on the SPL meter and keep it exactly where your face would be at the time of mixing. Now turn your audio interface volume knob up to the unity proceeds.
- Unity Proceeds – Information technology is a level at which the signal level is neither boosted nor adulterate. Mostly, unity gain is marked equally "0" or "U" on the audio devices. For your audio interface, it would be 0. You can consult your audio interface manufacturer for farther information on unity gain of your device.
- At present go to one of the monitors and turn its volume knob up while measuring the SPL meter levels. Stop turning the knob when you come across the SPL meter level exactly 82dB.
- Echo step 3 with the 2nd monitor.
- Now play some music and notice the level of sound sitting in your mixing chair. Also, try to discover out the sweet spot. Observe every bit it is clear sounding or non. If not, you can level up 1dB-3dB for better reference. Only above 85dB the sound is so loud to mix so always keep your volume levels below 85dB.
- If you have a subwoofer, you lot can also calibrate that with this method.
Voila, Now your studio monitors are now properly calibrated. At present its fourth dimension to railroad train your year for your 1st mix.
Ear grooming Method to understanding the Sound
This is the most important footstep which I tell anybody to follow for proper mixing. Especially if you accept a budget studio monitors, you must have trained your ears with those monitors.
The procedure is uncomplicated yet very effective.
- Choose a few audio tracks etc which y'all honey to mind to.
- Keep in mind that the genre of your chosen audio tracks must match the genre which you are going to mix.
- Wake upwardly in the early morning. I know guys waking upwardly in the morn is as well tuff for us. I was not an exception. Simply with courage, you can do this.
- Lock your studio doors. Start your organization and play the tracks i by one. Recollect, keep the volume level the same at which you wanna mix your projects.
- Observe the low-frequency sounds. Observe the intensity of kick pulsate. Then observe the intensity of the bass lines.
- Now come into the mid-range frequencies. Observe the mid-range drum items, guitar, and other mid-range instruments, etc.
- Now come to the loftier-frequency range. Observe all high-frequency items like snare and other percussion items.
- Terminal, come to the vocals. Considering vocals have a wide range of frequencies so you have to observe them with quite more attention.
- Repeat the procedure with other songs and audio tracks.
- Don't mix any project at day-one. Instead, repeat the procedure for iii-iv days.
- Later 3-four days your ears probably calibrated with the monitors and you lot are at present set to mix your projects.
- Note: Before every session, always heed to the same audio tracks for quick "Ear-alignment".
If you can't follow the in a higher place steps and so I have an award winning software for you that will assist you to TRAIN YOUR EARS without get through lengthy process.
Practise you desire to checkout that software? And then click here…
Determination: Set Up Studio Monitors
The important matter is, if you want to be successful in any field then y'all should gain all the available knowledge regarding that field. This is the key to success.
The motive behind this website is to provide the pre-purchase guide for studio monitors. These guides and reviews which I publish in this blog can aid you a lot to choose a better studio monitor for your studio.
Calibrating studio monitors as per your control room space is a tuff task for newbie recordists. If you have an existing studio, you probably realize that how to set up studio monitors for meliorate output? I think this guide would have solved this question.
Even if you have whatever query you can comment below, I would exist very grateful to solve your queries. Share this commodity with your recordist friends on social media as information technology would help them too.
You may too similar,
- Quiztones EQ Ear Preparation App [Review]
- Music Promotion Machine [Unbiased Review 2022]
Source: https://www.recordingbase.com/how-to-set-up-studio-monitors/
0 Response to "How To Set Up Studio Monitors With Subwoofer"
Post a Comment